
There’s nothing quite as fun and rewarding as decorating your home in a personal manner. DIY projects help you add a personal touch to your home.
And green design is a fun way to add style to your home in an environmentally conscious manner. One simple project is turning a a glass bottle into a beautiful lamp.
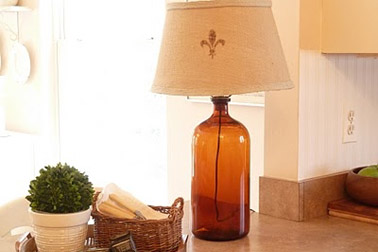
Imagine your favorite
wine bottle or a vintage bottle you found at a thrift store. Now picture it as the base for a lamp complete with a lamp shade of your choosing.
Here’s what you’ll need:
• Glass bottle
• Lamp shade
• Lamp wire kit – these can be found in a hobby store or home goods store
• A drill
• Epoxy resin or glue that works on glass
Note: If you want to paint the glass, you’ll also want to purchase acrylic paint in your chosen color.
Here’s How to Make Your Own Glass Bottle Lamp:
Step One: Choose Your Glass Bottle
Look for a bottle that not only appeals to you aesthetically, but also fits the lighting needs for the space. For example, you can make a lovely bedside table lamp from a small glass bottle. For larger lighting needs, such as in your living room, you’ll need a larger bottle or jug.
Step Two: Decorate the Bottle
If you intend to paint the bottle then now’s the time. Dilute your acrylic paint with water and pour it into the glass bottle. Roll the bottle to cover the entire interior surface of the bottle. Pour out the extra paint and let the bottle dry.
Step Three: Drill Your Hole
Choose a drill bit that’s large enough for your electrical kit. You want the cord to be able to fit inside the hole. Carefully drill the hole into the side of the bottle near the bottom and then weave the electrical cord through the bottle. You don’t want to drill a hole in the bottom of the bottle because it won’t sit flat on your table after you insert the cord. It’s also a good idea to use a bit of tape where you will be making the hole to give the glass more resistance.
Step Four: Connect Electrical Cord Kit
Connect the electrical cord kit at the top of the bottle. Glue the light bulb mount, which is the top part of the cord kit, to the top of your bottle. Let dry.
Step Five: Add Your Light Bulb and Shade
Once the glue is dry, you can screw in your light bulb. Make sure it’s the correct wattage for the cord kit. Add your lamp shade and start enjoying your new DIY glass bottle lamp.
Note: You can also skip the electrical cord kit, light bulb and shade by drilling a larger hole and inserting led holiday lights within the bottle and just plugging it in!
If you’re looking for new ways to recycle and enjoy green design then a glass bottle lamp is an enjoyable project. You’ll be able to appreciate your new lamp for many years to come.