Plastic, glass and metal go to recycling facilities, but organic or biodegradable waste usually ends unnecessarily in the landfill. And reducing the waste of your household is one of the most fundamental keys to green living.
Follow this a step-by-step instructions for building a compost bin, and learn different ways to process organic waste with it.
Cold and hot compost
Cold composting is as simple as piling in a corner of your garden all yard waste -like grass clippings, leaves, twigs and wood chips-, paper and vegetables waste -like leaves and peels, without seeds and coffee grounds-. Within about a year, those components brake and you have your compost. This method doesn’t need anything more than a free space in your garden, isolated from pets that can play and spread it, making a mess.
Hot composting accelerates this process with the help of bacteria, and you can have nice compost in about one to three months in warm weather. Those two methods can get smelly, so they are better done in the outdoors.
For indoor composting, the best option is worm composting, that we already detail in this post: How to make your own worm composting system.

What do you need to make hot compost
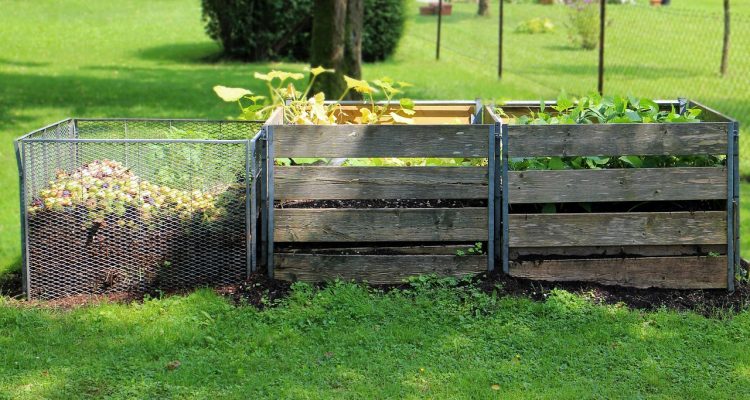
- A compost bin: There are portable plastic tumblers or “composters” that you can purchase in garden or home stores. This are usually the “Rotating composter” type, that rotates -shocking!- to move the material in the inside.
For larger needs, you can ask your landscaper to build a “Stationary composter” in a hidden area of your garden, with chicken wire or wooden boards. Make sure that is big enough to hold the first load of garden waste and paper, and that there will be enough space to keep on receiving the waste you generate daily. With this method, you will need to remove the material with a garden fork to aerate it. - Green waste: This will provide with nitrogen to the mix.
Fruit scraps, without seeds.
Vegetable scraps, without seeds.
Eggshells, clean.
Coffee grounds and tea leaves, with paper filters or biodegradable textile bags.
Grass and plant clippings, recently cut. - Brown waste: This will provide with carbon
Nutshells, chopped.
Dried leaves.
Wood and bark chips, from pruning.
Shredded paper.
Hay and forage, without seeds
Sawdust from untreated wood. - Water: Make sure you have a hose nearby to moisture the mixture frequently.
- A soil thermometer
- A compost starter (optional)

Waste to avoid: Animal products like, meat, bones or milk; vegetable oils and butters, and most elaborated cooked food -with the exception of peels taken from cooked vegetables like pumpkin, p.e.-; seeds and fruits that can germinate; glossy paper like from magazines and flyers and coated paper or cardboard; sawdust and chips of treated or painted wood or wood in large chunks; cigarettes and tobacco in general.
Instructions:
Collect and place the first batch
- Depending on the size of your chosen composter, collect green and brown waste in equal quantity until you can pile at least 3ft. This can be a little less in a tumbler, but the bigger the better when using a compost pile. When you reach that amount, place it mixed in your composter.
You can cheat here, adding to the first batch a starter or activator powder that you can buy at most garden stores. Those powders contain a mix of microorganisms that help kickstart the decaying process, that then go on smoothly. As said before, this is completely optional, and your compost bin will naturally start to break sooner or later.
With a hose, water the mixture abundantly. In a tumbler, excess water will drain from the openings in the base, and in a stationary composter, it will percolate to the soil. - Remember to keep the mixture from moisturized to definitely wet, and never let it dry because it will kill the bacteria responsible of the decomposing. Of course, you don’t want to see puddles because your pile will rot instead of compost
Rotate the mixture - The compost needs oxygen during the growing stage, so you need to rotate the mixture once a week. In a tumbler, just spin the container a couple of times until you can feel the material loose. In a stationary composter, mix the layers with a garden fork.
The best time to stir the pile is when the thermometer reads between 130º F and 150º F, or when you feel it warm in the center. Do not skip this step -not even once- because the waste can become matted down, develop bad odour and rot, and just ruin the whole batch.
Keep adding organic waste and water - Add daily the green waste from the kitchen and newspapers, grass clippings or wood chips. Remember to add green and brown waste almost in equivalent amount to keep the balance.
- Add water with the hose, as necessary to keep the compost wet and with a steady temperature. Pay attention to the smell: it can be noticeable but not like rotten or spoiled.

Your compost will be ready when it looks like a dark loose soil, with a subtle and agreeable smell.
You can use your compost to lose a clay soil directly on the garden or in a mixture for pots and planters. A good natural compost mixed with sand is the best bed for rock gardens too, because it will give the plants enough nutrients in a small amount of soil.
And, besides the end use of it, making compost is a nice green project to involve the whole family.
If you have any question or you want to share some composting tip, please leave us a comment below.